HOW TO USE SILO.
user guide
Load a photo, check the subject and turn it into lines.
Refine the lines, add optional gray fill and save at the right size for your drawing.
Click any screenshot to open a larger view in a new tab. Screenshots show the Japanese interface; use the matching English controls described here.
WORKSPACE
Adjust settings while keeping the whole image in view
Settings are on the left and the workspace on the right. Both resize with your window or split-screen view while keeping this arrangement. Scroll settings independently; the workspace stays within the screen. On narrow screens, scroll the view tabs or zoom tools horizontally.
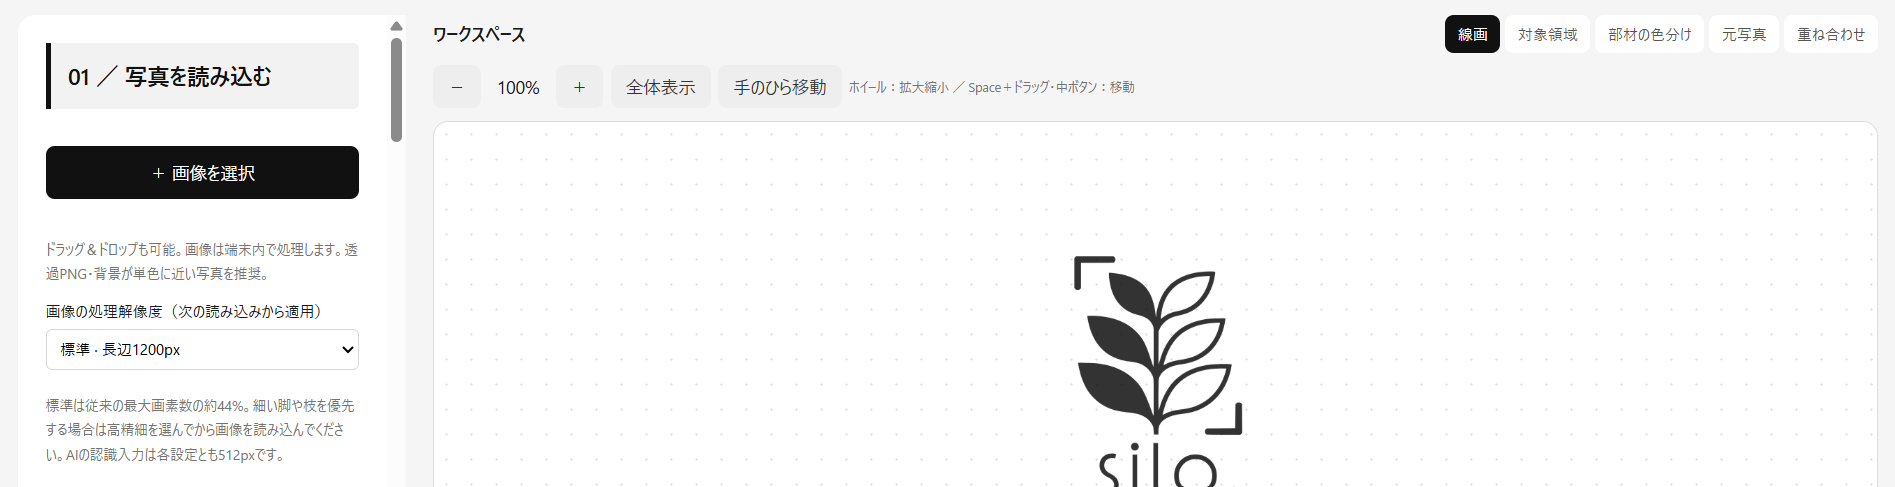
The workspace shows the logo until you load an image, then displays your image.
Load image → check and correct mask → generate lines → adjust part boundaries → smooth / repair lines → trim unwanted lines → set dimensions and save.
View tabs
- Line drawing
- Check only the generated and edited lines
- Subject mask
- Check and correct the subject and background mask
- Part colors
- Check and correct automatically segmented parts
- Original photo
- View the loaded image
- Overlay
- Compare the photo and lines together
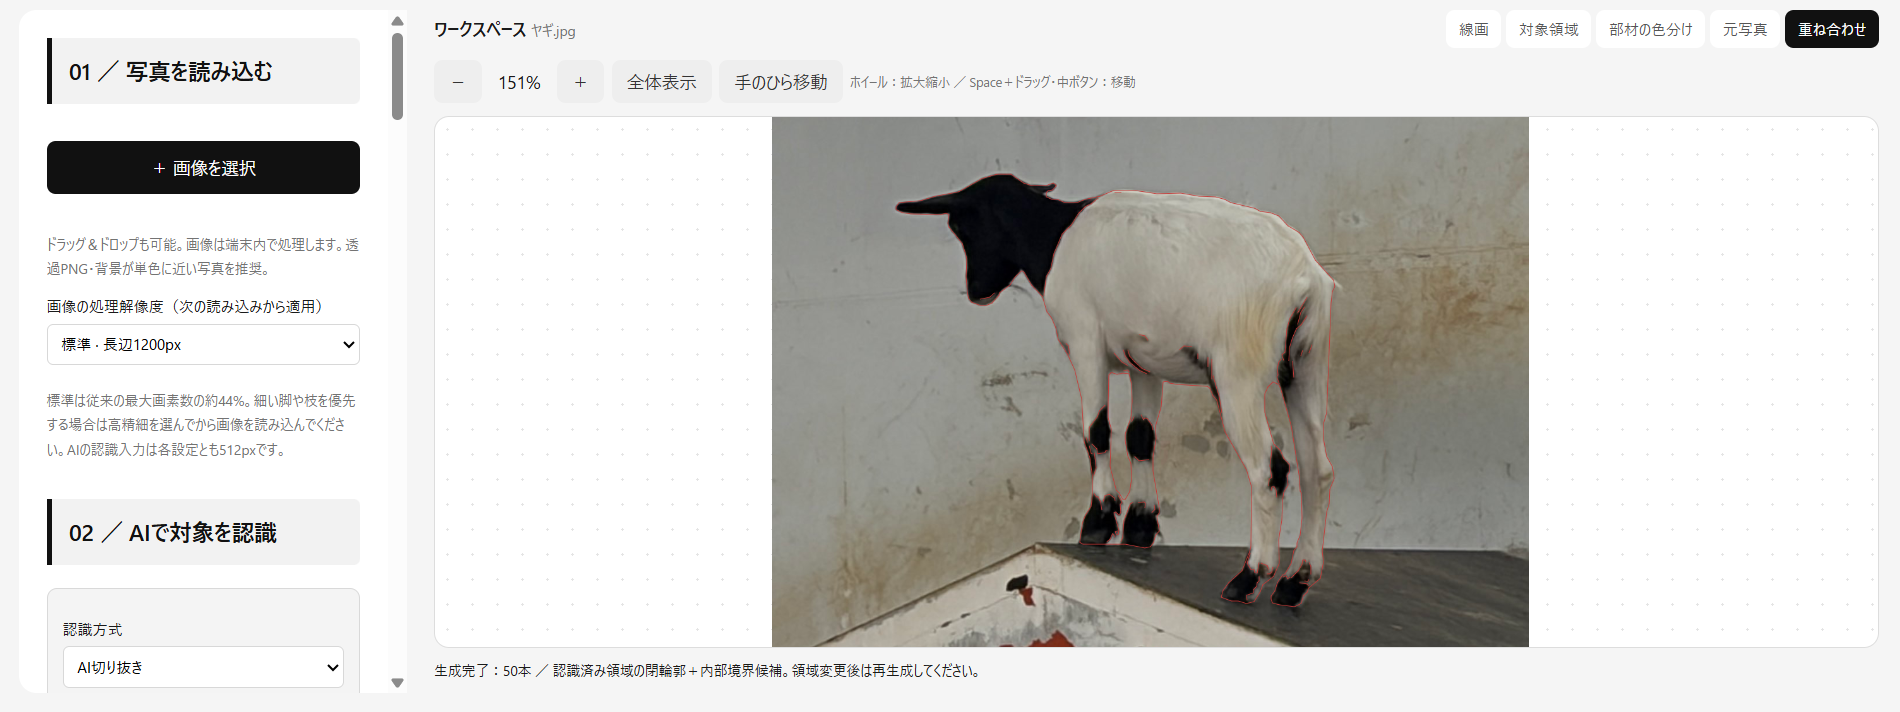
Zoom and pan
Use +/− or the mouse wheel over the workspace to zoom.Choose Pan tool and drag to pan. On a computer, you can also use Space + drag, or drag with the middle mouse button.
Fit to view returns the entire image to view. Zoom does not affect the exported drawing’s dimensions.
STEP 01
Load a photo
- Choose Processing resolution. Changes apply the next time you load an image.
- Select + Choose an image to select a photo, or drag and drop it onto the workspace on a computer.
PNG, JPEG, WebP and other browser-supported images are accepted. Use an image up to 30MB, showing the entire subject with a clearly distinguishable background.
| Processing resolution | Longest edge | When to use it |
|---|---|---|
| Fast | 900px | Prioritize responsiveness |
| Standard | 1200px | A good starting point |
| High detail | 1800px | Retain fine lines such as legs or branches |
This does not upscale small images. Higher resolution does not always improve recognition; check important details in Subject mask as well.
STEP 02
Recognize the subject
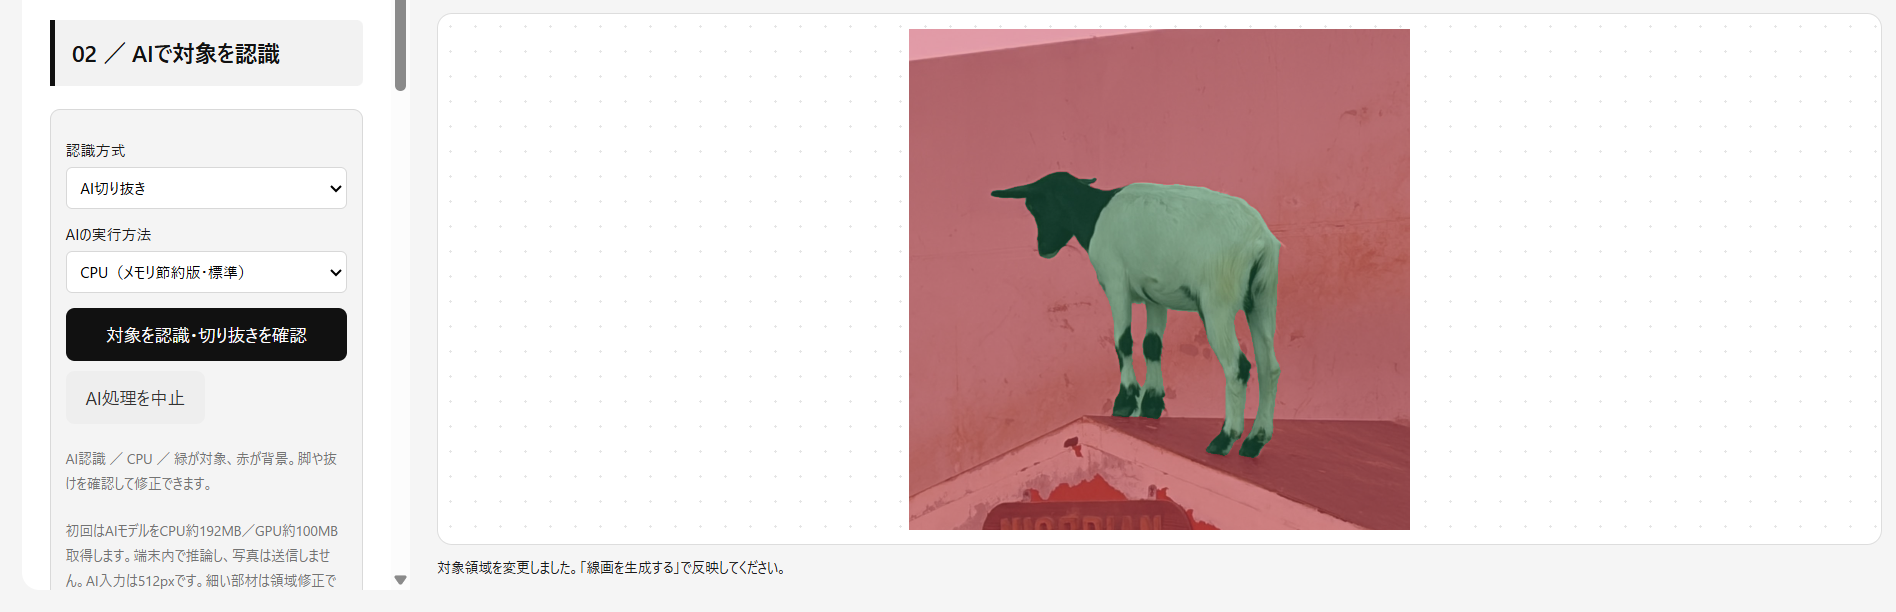
- Under Recognition method, choose AI cutout.
- Select Recognize subject / check cutout.
- In Subject mask, check the parts to retain and the gaps inside the subject.
Downloading the model takes time on the first run. CPU is the default; supported devices can use Automatic (GPU → CPU). Recognition is reused when regenerating the same image.
Using silo. on a phone
Photos fill the mobile workspace. After importing an image, pinch with two fingers to zoom while keeping the photo centre fixed. Moving your fingers does not pan the photo. You can zoom with the brush selected. Enable Pan tool and drag to reposition the photo; turn it off to resume the selected brush. Navigation does not paint the selection. You can also use + and − to zoom, and Fit to view to reset. Open settings from the bottom step buttons or Adjust, and return with Close. Use Menu at the top to visit other pages. Transparent PNGs generate linework on import on mobile. For regular photos, open 3 Lines and tap Generate line drawing for automatic AI cutout and linework.
Mobile AI runs for free on your device without uploading photos. The first download is about 15–18MB. Choose the subject type at the top of Adjust. People uses dedicated AI for the whole person, including clothing, arms and legs. For other subjects, choose Furniture, Plants, Animals or Other. Changing the type resets the cutout for fresh recognition. Select a photo, open 3 Lines, then tap Generate line drawing. For multiple subjects, draw a box first. These smaller models differ from PC AI, so fine details and complex backgrounds may need brush corrections. After an interrupted run, the next session starts in Colour / brush mode.
Tap 1 Photo, 2 Recognise, 3 Lines or 4 Save at the bottom to open its detailed settings. Choose an image in 1 Photo, use Generate line drawing in 3 Lines, and choose the export format and scale in 4 Save. Use 2 Recognise to check and correct the cutout.Use JPEG or PNG under 8MB. Convert HEIC to JPEG. For large photos, resize to a longest edge of 2000px or less. Save as SVG or line-only DXF on mobile. Use a PC for DWG export.Use Keep and Remove brushes if the subject and background are not separated correctly.
Select a subject in a busy photo with a box and clicks
For your own photos or photos with multiple subjects, specify what to keep. For a palm tree, add points on both the leaves and trunk to refine recognition.
- Select Draw a box to recognize and drag around the entire subject. For a tree, include the leaf tips and the base of the trunk.
- After drawing the box, click inside the subject to start recognition. Drawing the box alone does not start recognition.
- Select + Click subject to add points inside missing leaves, trunks or legs. Each added point runs recognition again.
- If the sky or nearby trees remain, choose − Click background and click the area to exclude.
- To undo an incorrect point, use Undo a point . When finished, choose Finish point selection.
- Check that green marks the subject and red marks the background, then choose Generate line drawing →.
Start with a point in the crown, then add a point inside the trunk. Add subject points on any missing leaves. After excluding background, check that the trunk is still kept. For multiple trees, draw a box around one tree at a time.
Drawing a new box resets the current mask, mask edits and line drawing. Fine leaves and overlapping background may still need brush corrections.
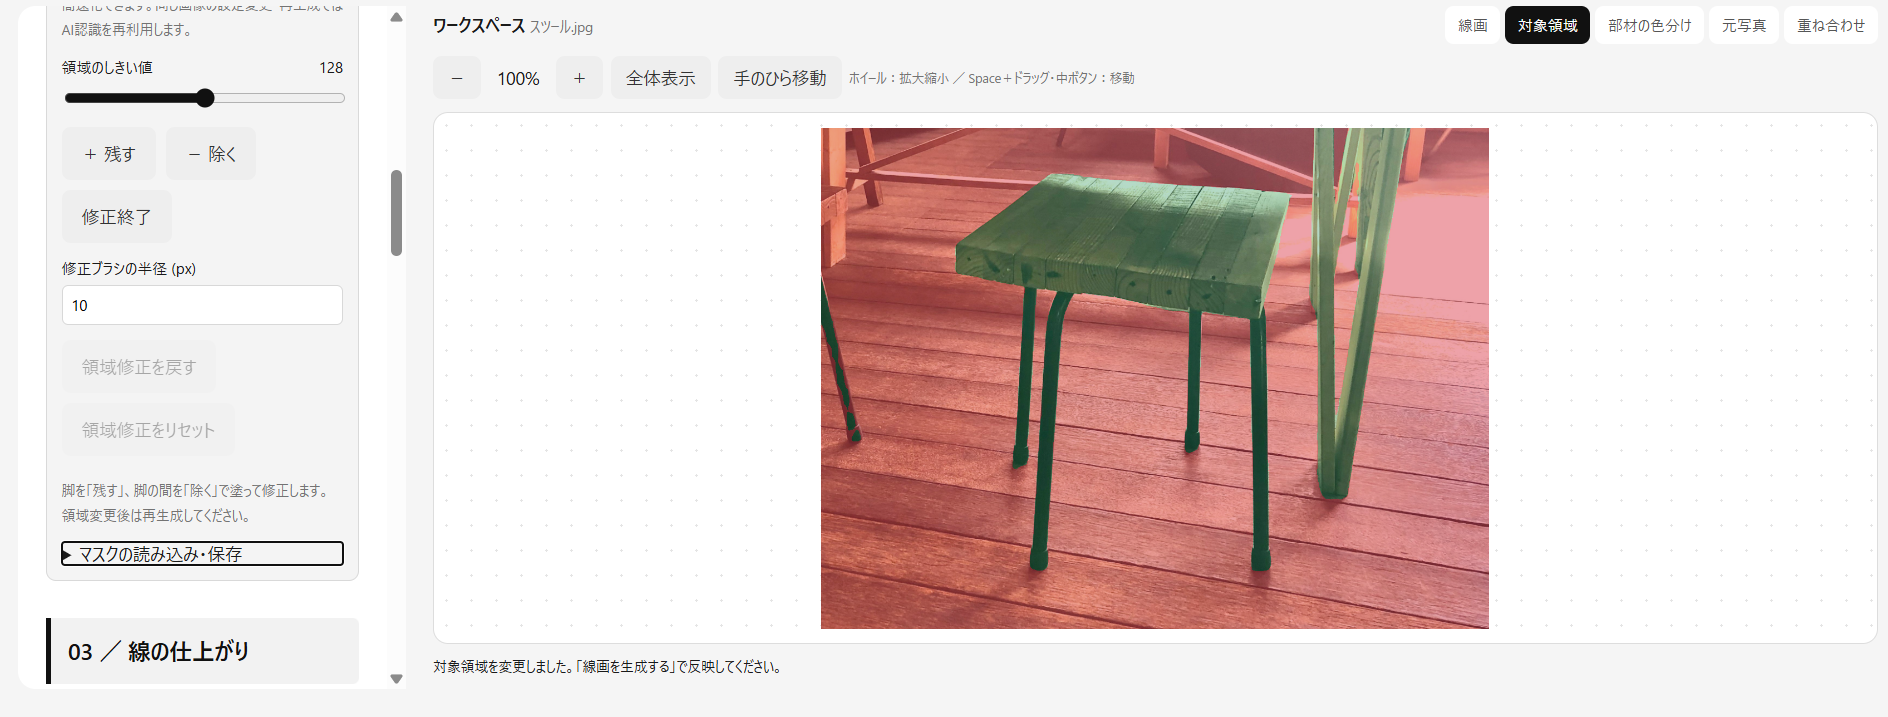
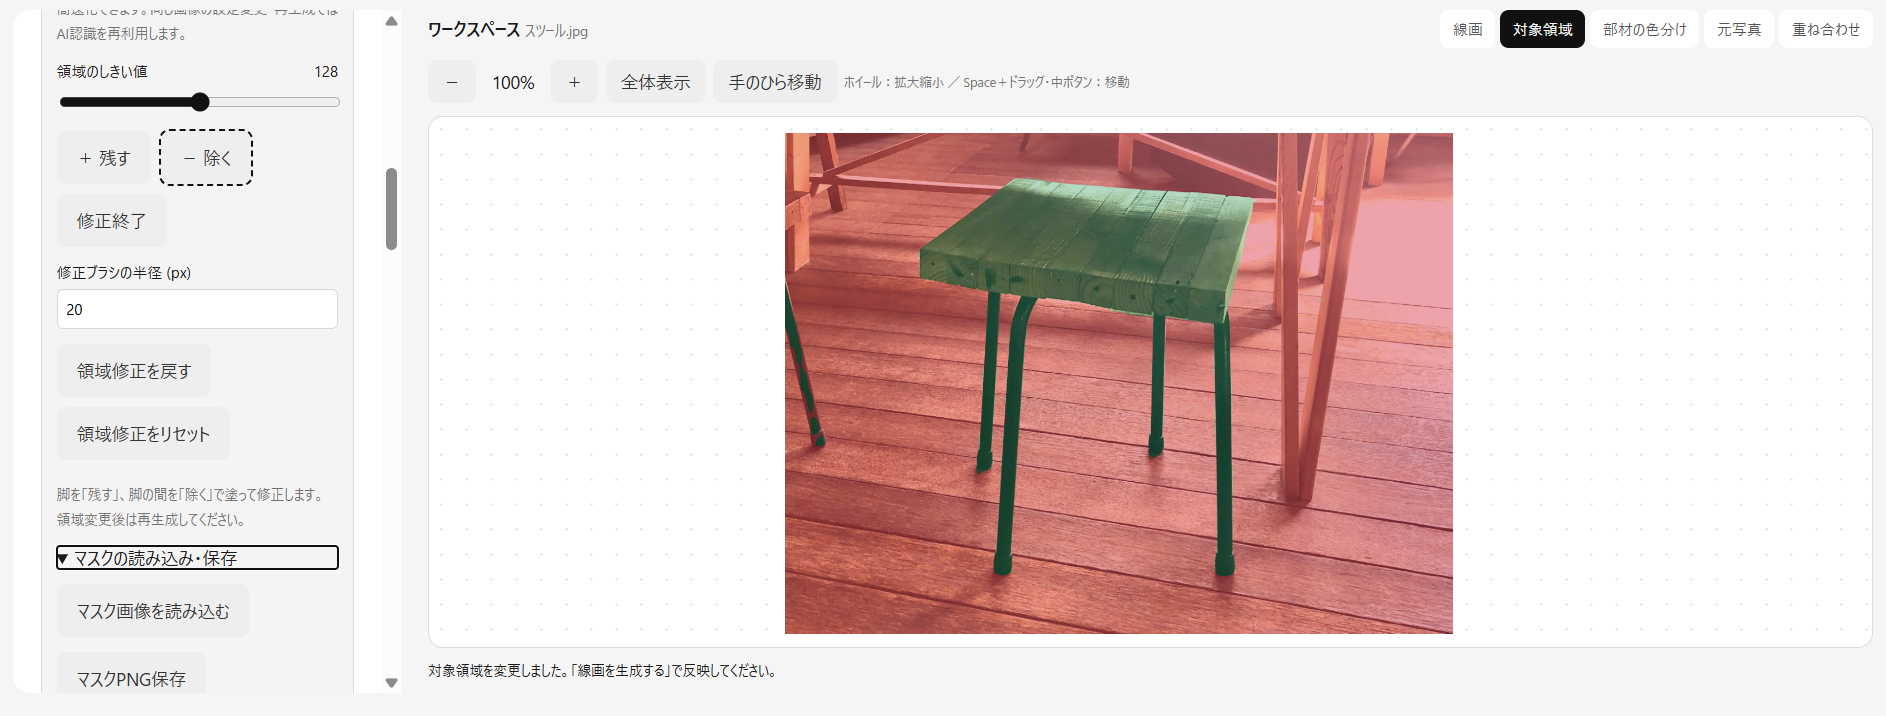
Correct the mask with a brush
- Select + Keep: paint over missing legs or branches to keep them.
- Select − Remove: paint over unwanted background or gaps to remove them.
- Adjust Mask brush radius (px). When finished, select Finish mask editing.
Undo mask edit cancels your last stroke; Reset mask edits clears all brush edits. You can also adjust Mask threshold. Regenerate lines after changing the mask.
Use transparent images, existing drawings or saved masks
For transparent PNGs, choose Use transparent PNG alpha. For existing line drawings, choose Classic / existing line drawing.
Import / export mask accepts a white-subject, black-background mask with the same aspect ratio as the original. Save mask PNG saves the mask, separately from the finished line drawing.
STEP 03
Choose the line style
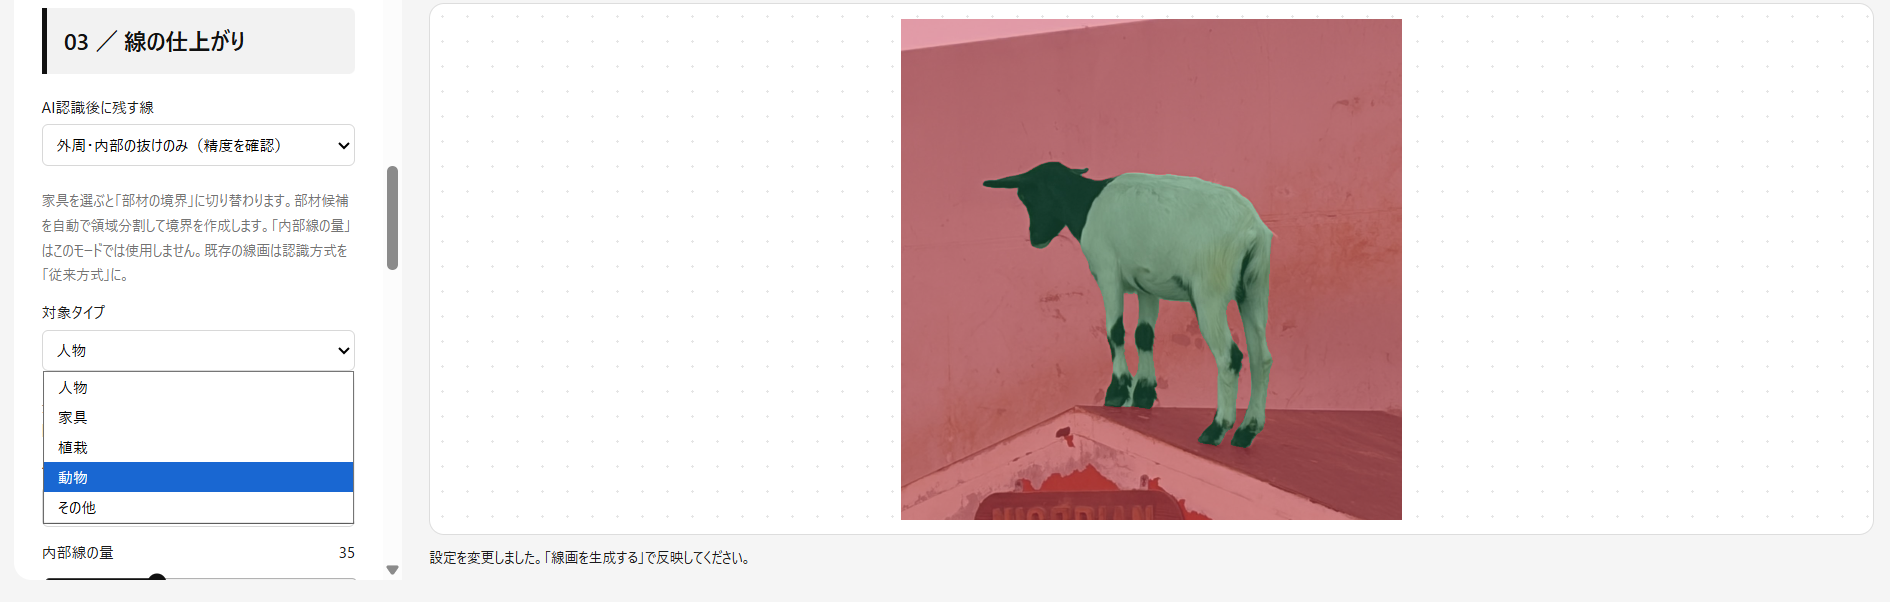
- Under Subject type, choose People, Furniture, Plants, Animals or Other. Changing the type also changes defaults and height, so check dimensions at the end.
- Choose Lines to keep after recognition and a Line preset.
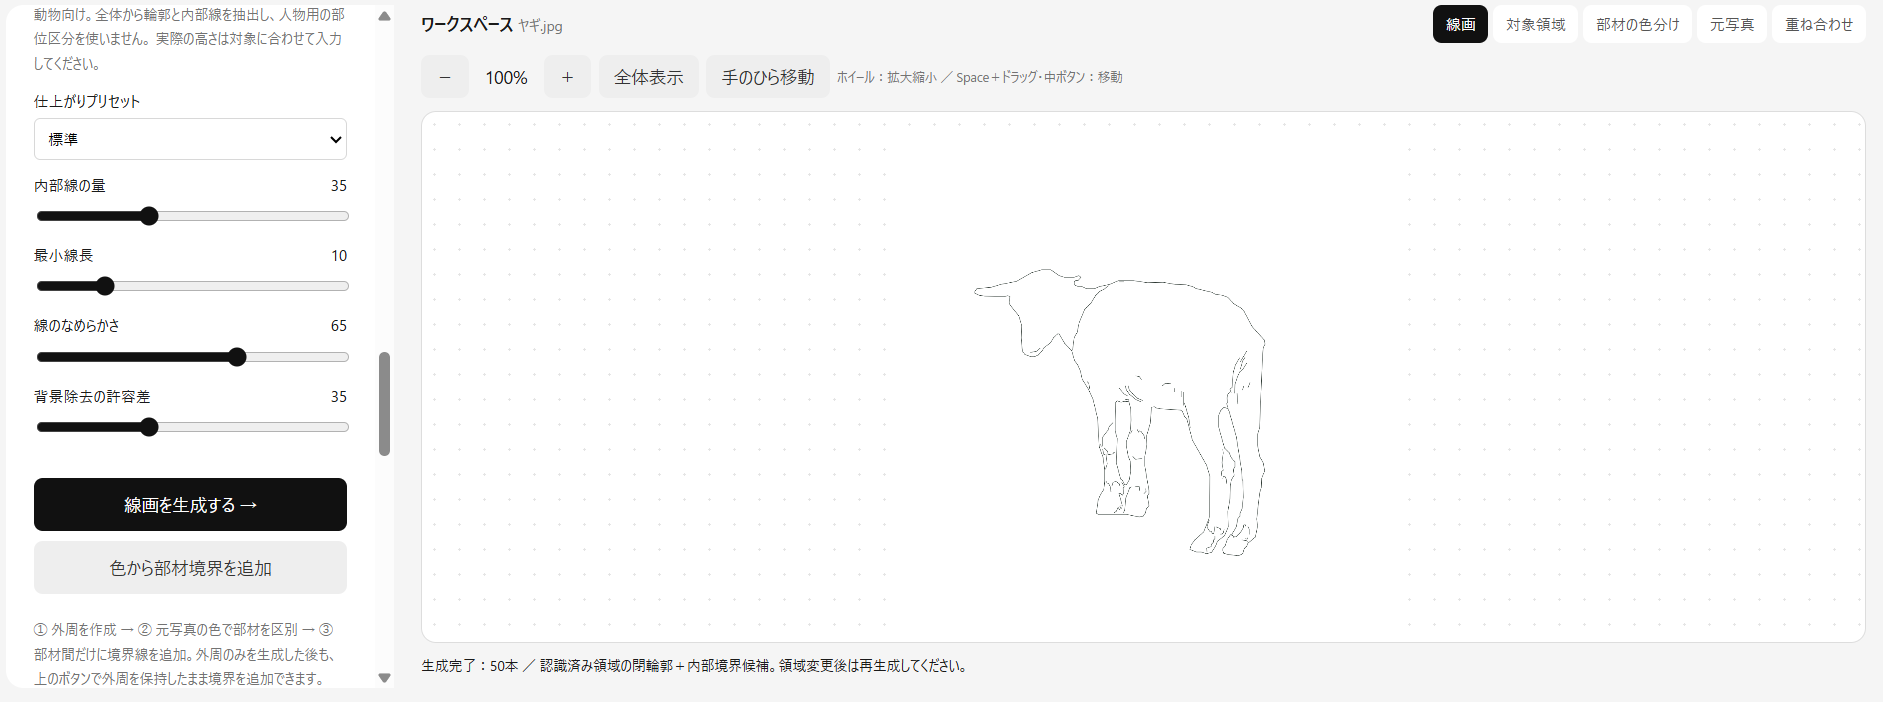
- Select Generate line drawing →, then check Line drawing or Overlay.
| Lines to keep | Purpose |
|---|---|
| Outline + holes | First check the silhouette and gaps |
| Outline + part boundaries | Add boundaries between furniture parts |
| Outline + internal boundary candidates | Try this when you want interior detail |
Other provides general settings for subjects outside the four named categories. It does not use body-height regions.
Start from Standard, Clean or Keep details. After changing settings, select Generate line drawing again to apply them.
Adjust people or furniture with Classic recognition
For people, Adjust regions of a person controls head, clothing and shoe lines by height. Furniture provides line styles, input types, gap repair and auto-connect distance. Their effect depends on recognition and line mode.
In Outline + part boundaries, Internal line amount does not adjust boundaries. Use Part colors instead.
MATERIAL BOUNDARIES
Correct part colors
Outline + part boundaries creates colored candidate parts. After generating just the outline, you can also use Add part boundaries from colors to add boundaries while preserving the outline.
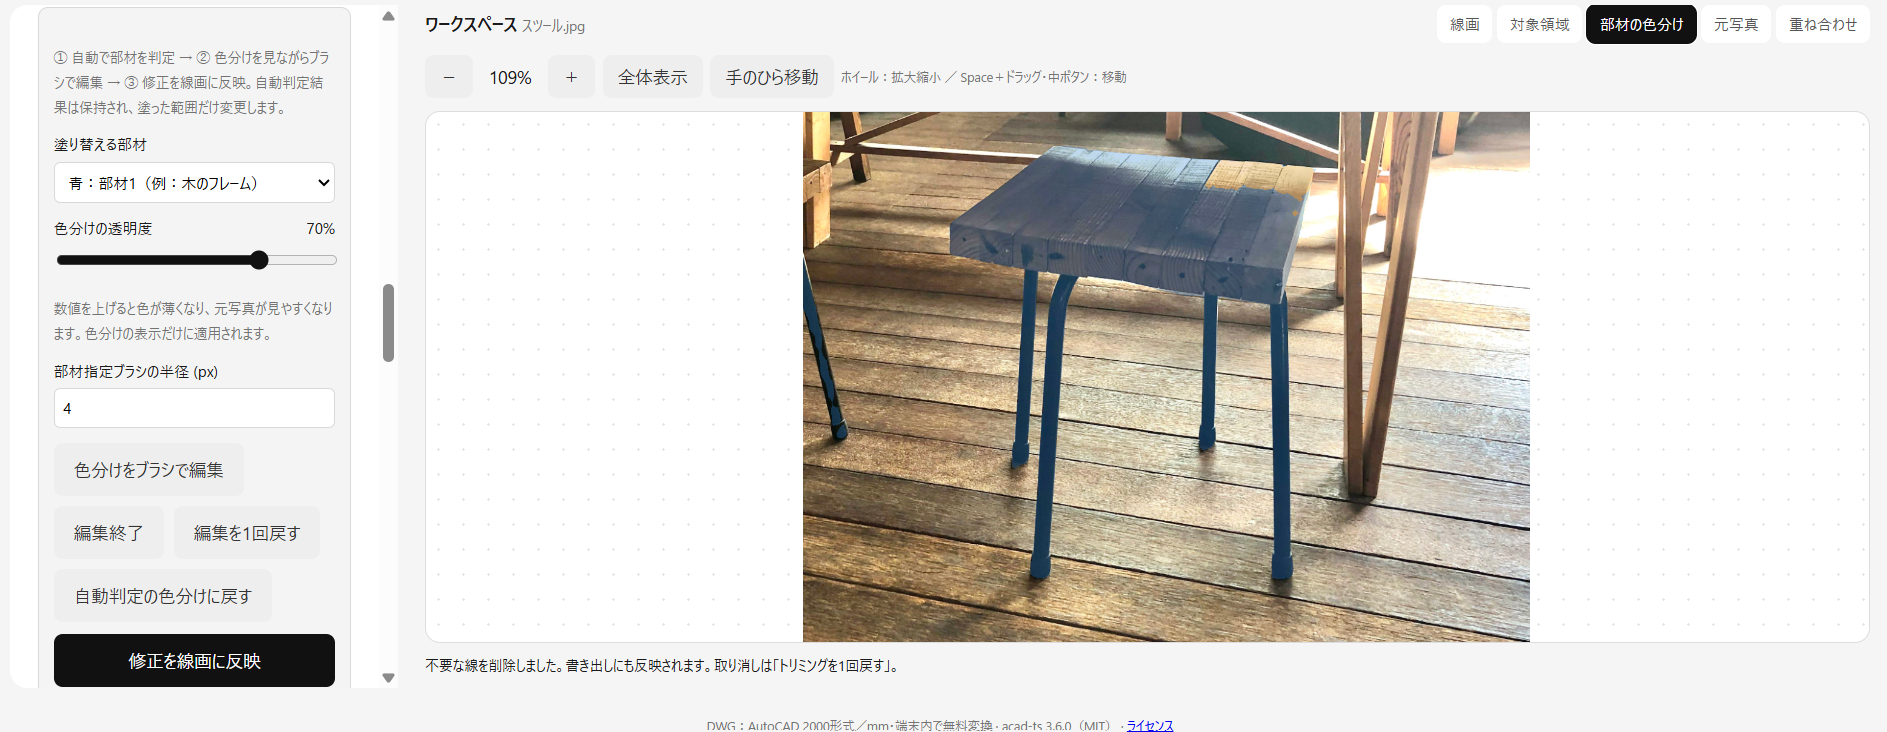
- Switch to Part colors.
- Choose part 1–6 in Part to paint, then select Edit part colors with brush.
- Paint regions that belong to the same part with the same color, then select
- Select Finish part editing, followed by Apply edits to lines.
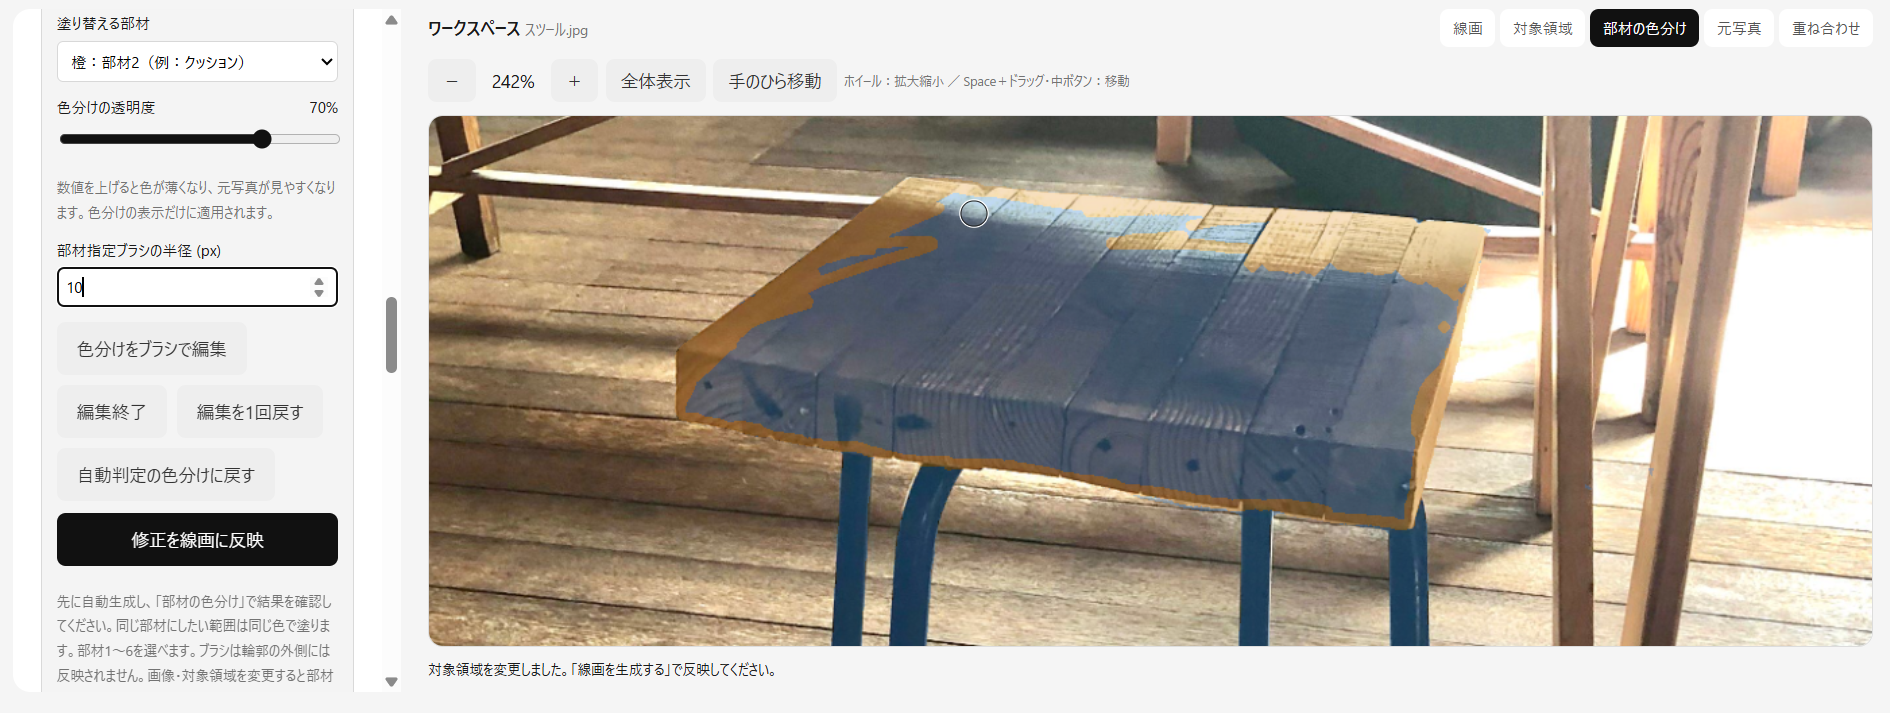
Adjust the circle with Part brush radius (px). Zoom in for detail. Undo part edit cancels the last stroke; Reset to automatic part colors clears brush edits.
Part overlay transparency defaults to 70%. Higher values make colors lighter and reveal the photo. This affects only the preview, not exported lines.
Unpainted areas keep their automatic classification. Changing the image or mask resets part edits.
EDITING TOOLS
Refine and remove unwanted lines
Repair, finishing and trimming are grouped under Refine the lines on the left. Open the section you need.
Smooth the lines
- Open Finish lines before export.
- Adjust Smoothness and optionally enable Preserve major corners.
- Select Smooth generated lines.
Zoom in to check the shape; use Undo line finishing if needed. Finish smoothing before committing your final trims.


Connect broken lines
Connect lines manually, then click the two endpoints. Undo repair cancels the connection. Select Finish repair to exit.


Four deletion methods
Open Trim unwanted lines, choose a Deletion method, then select Start trimming. Edit in Line drawing or Overlay view.
| Deletion method | Operation and affected lines |
|---|---|
| Delete section | Click a start and end on the same line to delete the section between them. On a closed outline, the shorter arc is removed. |
| Delete whole line | Click an unwanted line once to remove the entire line. |
| Selection window | Drag left to right (solid window) to remove fully enclosed lines. Drag right to left (dashed crossing window) to remove entire lines touching the window. |
| Eraser | Paint over only the section to remove. Adjust Eraser radius (screen px) to change its size. |
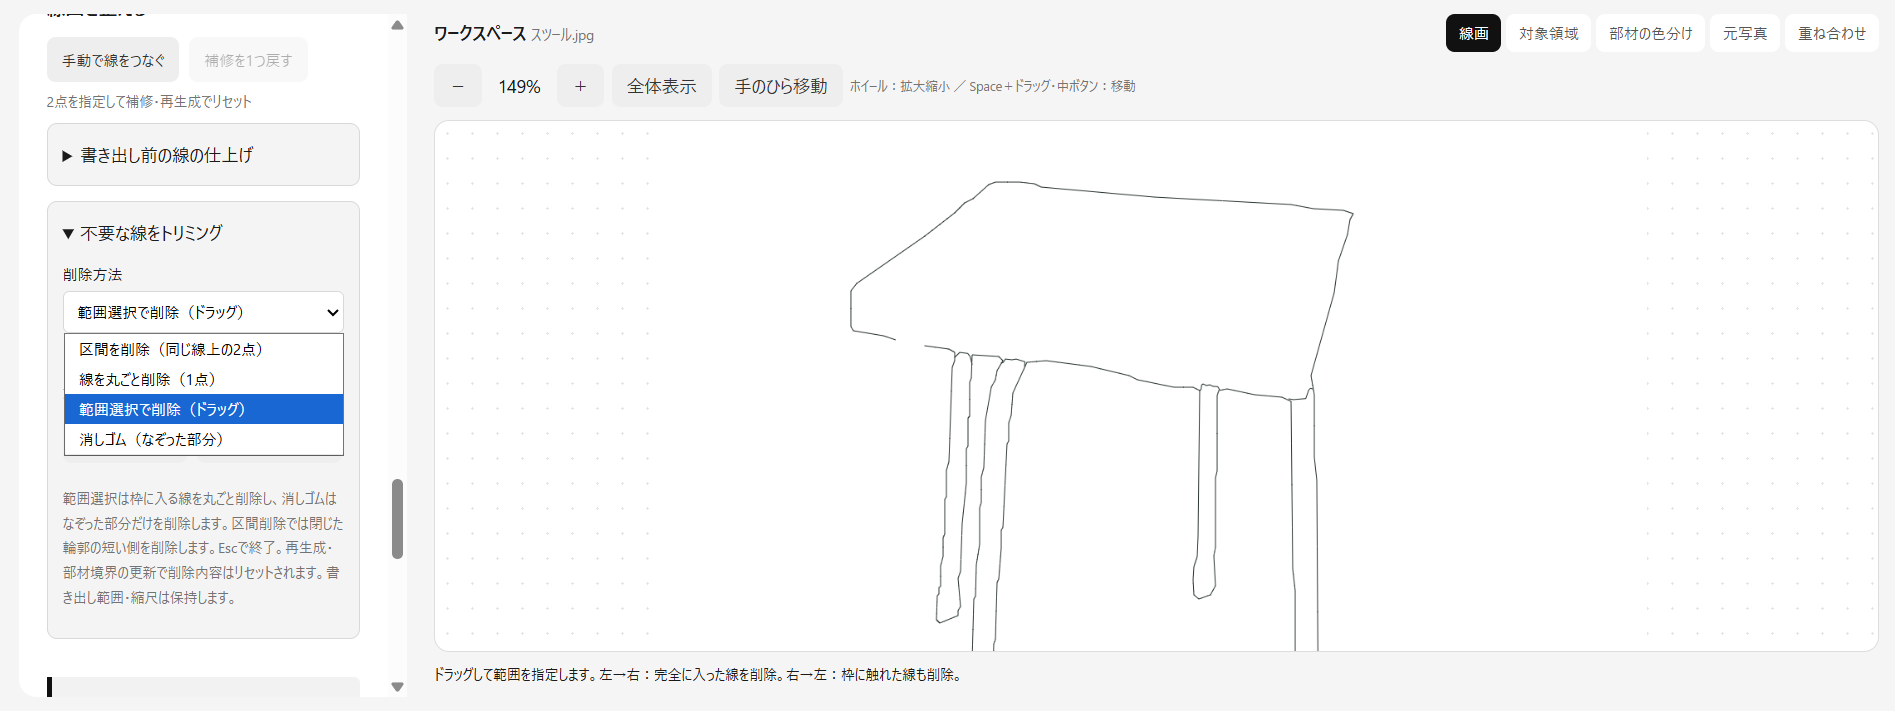
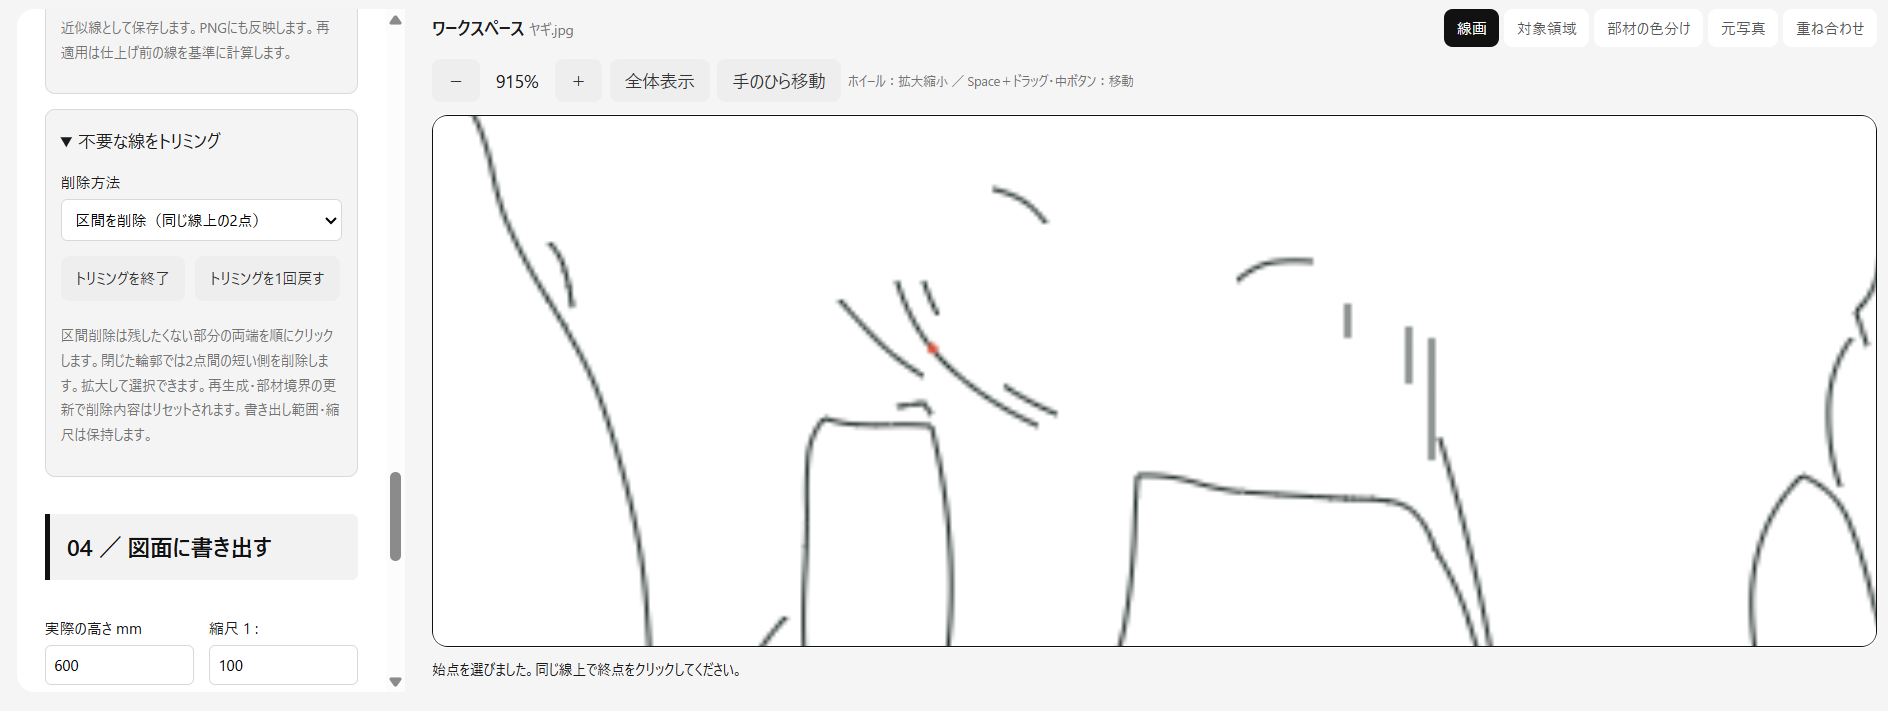
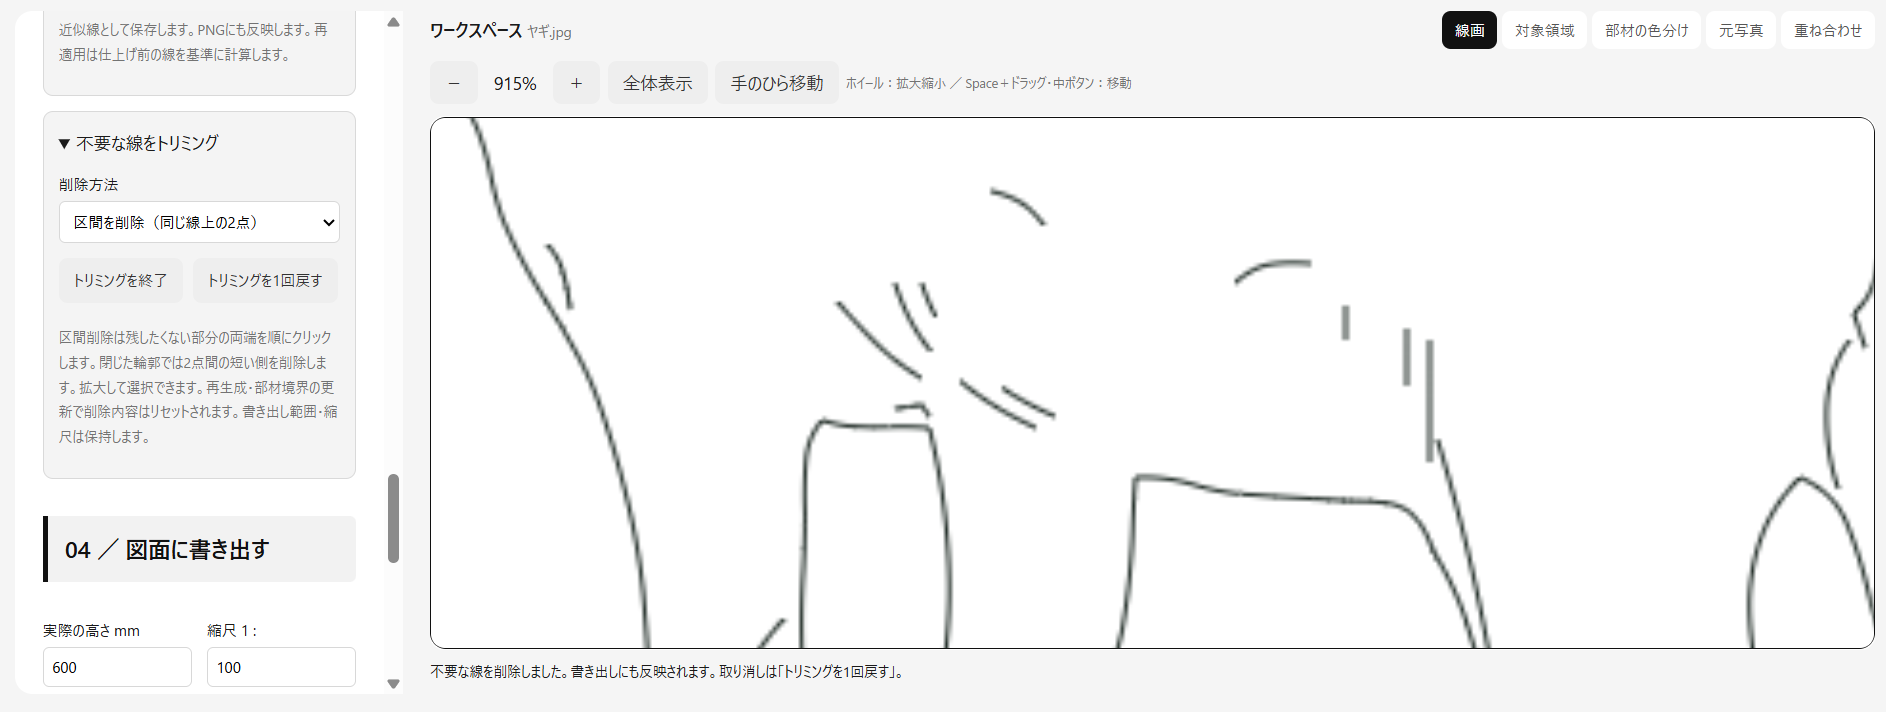
The images show Delete section. Selection window and Eraser use the drag gestures described above.
To remove only part of a long line, use Eraser or Delete section. Selection window removes entire selected lines.
Undo trim cancels the last action. Each drag in Selection window or Eraser counts as one undo. Finish with Finish trimming or Esc. To move the view, use Pan tool or Space + drag.
Trimming preserves export bounds and scale. Regeneration or part-boundary updates reset trims and repairs, so complete mask and part adjustments before final editing.
AFTER STEP 03
Add gray fill inside the outline
After generating and editing, use Add gray fill inside the outline between steps 03 and 04. Switch between lines only and filled silhouettes.
- Under Outline fill, choose Add gray fill.
- Move the Fill transparency slider.0% is opaque; 100% is transparent.
- Check the result in Line drawing or Overlay. Changes appear immediately; no regeneration is needed.
- To remove the fill, select None (lines only). Set dimensions and save in step 04.
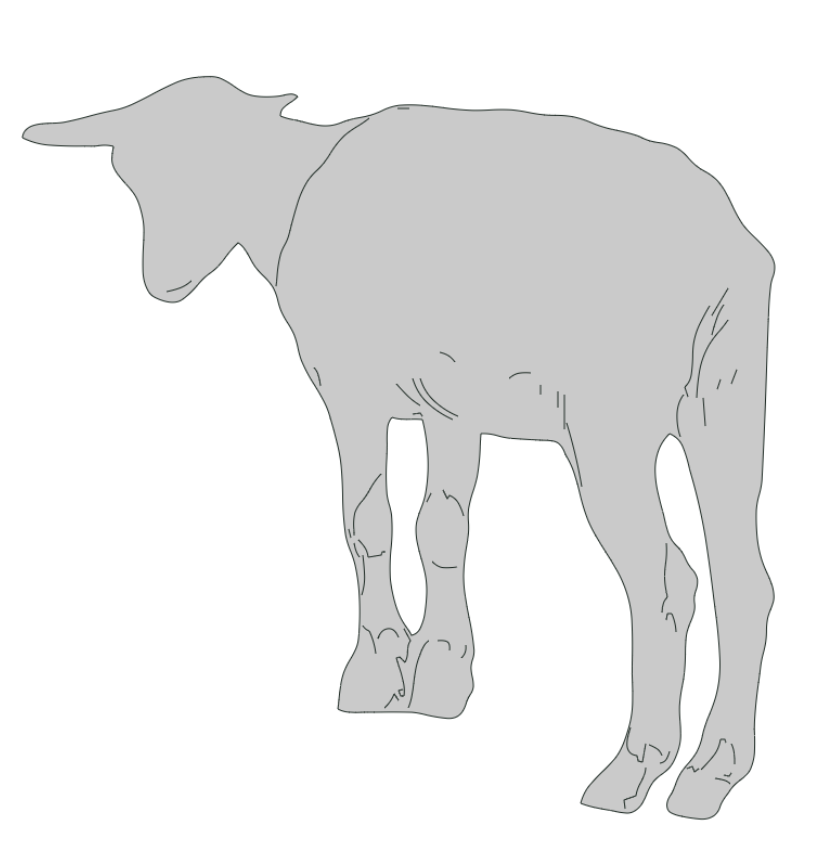
Fill requires closed outlines. Trimming an outline open hides its fill; undo the trim or regenerate a closed outline. Also check that transparency is below 100%.
Exporting fill and transparency
SVG preserves fill transparency. DWG and DXF use gray hatches approximating the appearance on white paper: they are not transparent CAD faces, and shades change in steps. Save settings includes fill on/off and transparency.
STEP 04
Export for drawings
- Enter the subject’s actual height in Actual height (mm). For multiple objects, use their combined height.
- Enter the scale denominator in Scale 1 :. For 1:100, enter 100.
- Choose Export mode for your purpose and check the output dimensions shown below it.
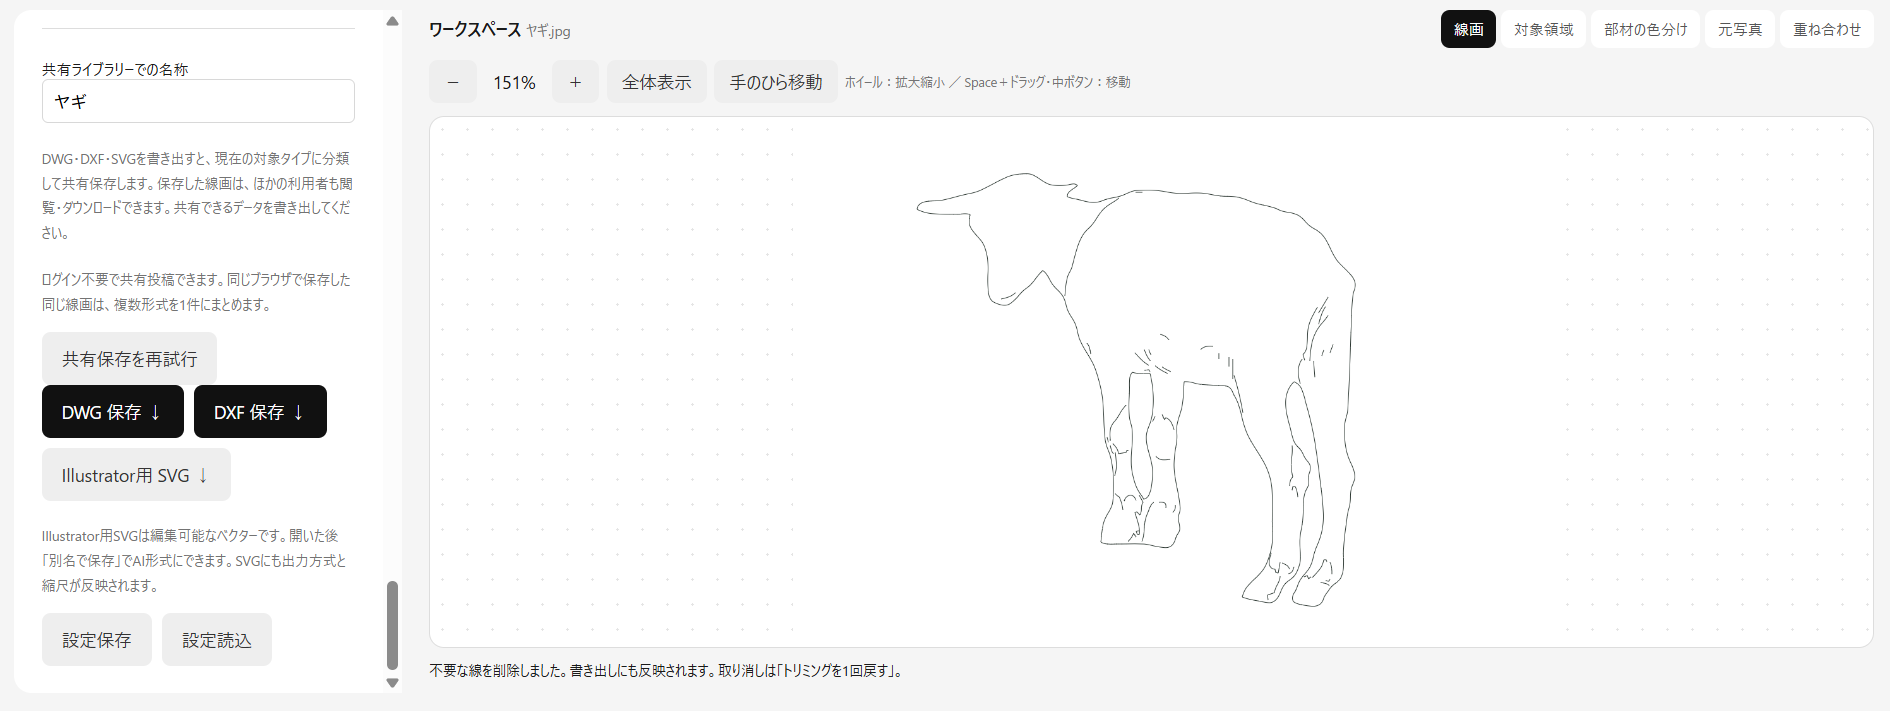
- The shared-library name is optional. A name is generated automatically if left blank. Choose Save DWG, Save DXF or SVG for Illustrator.
| Export mode | Exported height | Purpose |
|---|---|---|
| CAD model space (actual size) | The actual height entered | Place at actual size in CAD model space |
| Paper size | Actual height ÷ scale denominator | Place at the chosen scale in Illustrator or on a drawing sheet |
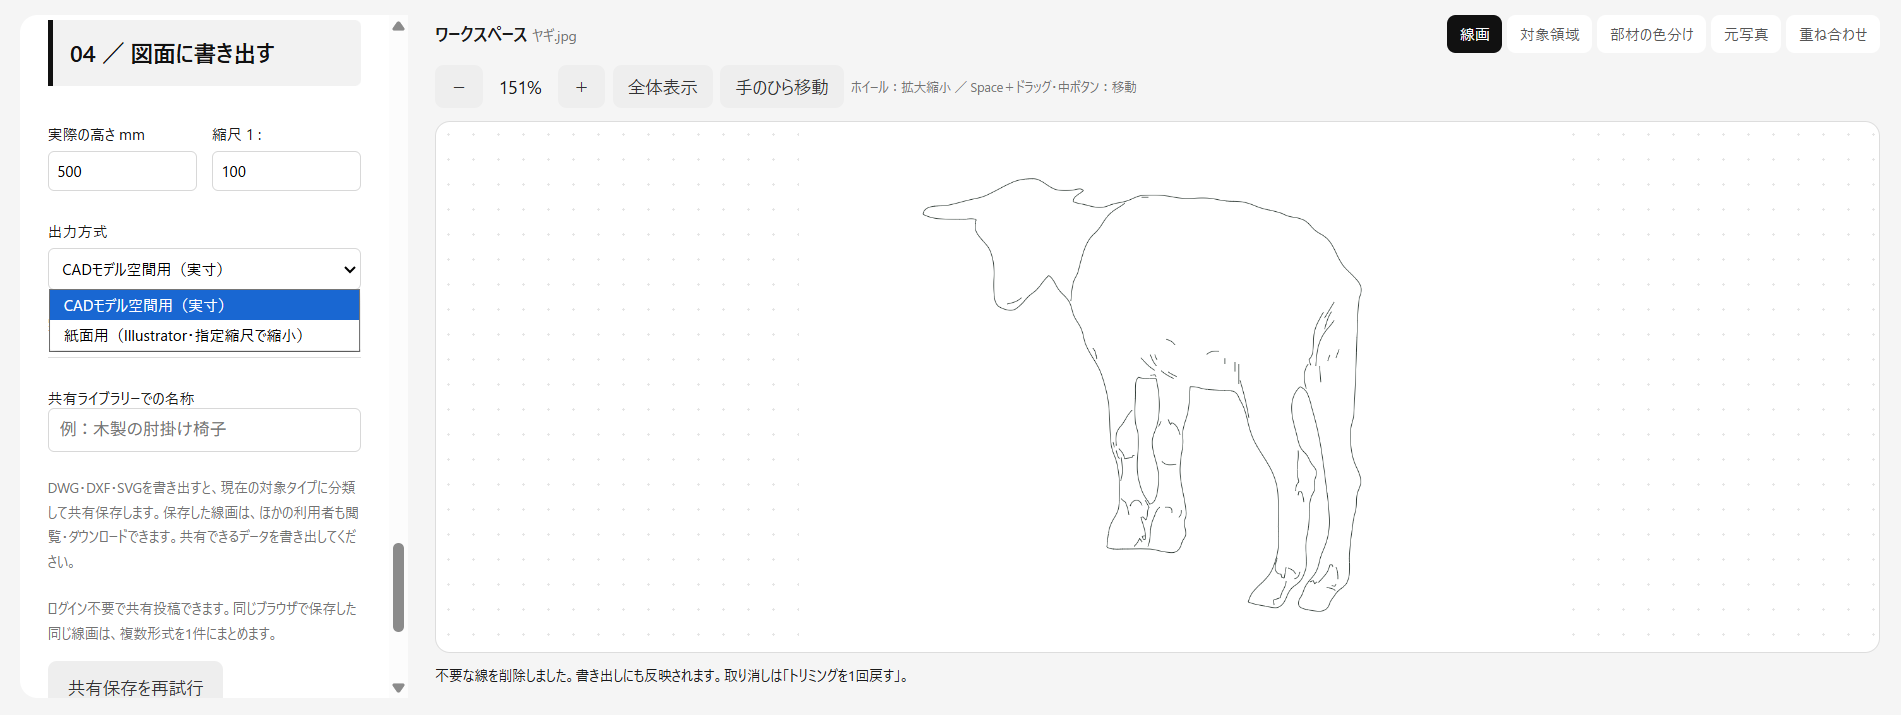
Paper size exports the figure at a height of 17mm.
Choose a format
| Format | Recommended use |
|---|---|
| DWG / DXF | CAD line drawings in AutoCAD 2000 format, in millimeters. |
| SVG for Illustrator | Editable vector data, with finished curves saved as Béziers. Open in Illustrator and use Save As for AI format if needed. |
Export mode applies to DWG, DXF and SVG. View zoom does not change export dimensions. Choose Paper size for scaled placement in Illustrator.
Save settings and Load settings store parameters, not the original image, brush edits, repairs or trims. Save finished work as DWG, DXF or SVG before reloading or replacing the image.
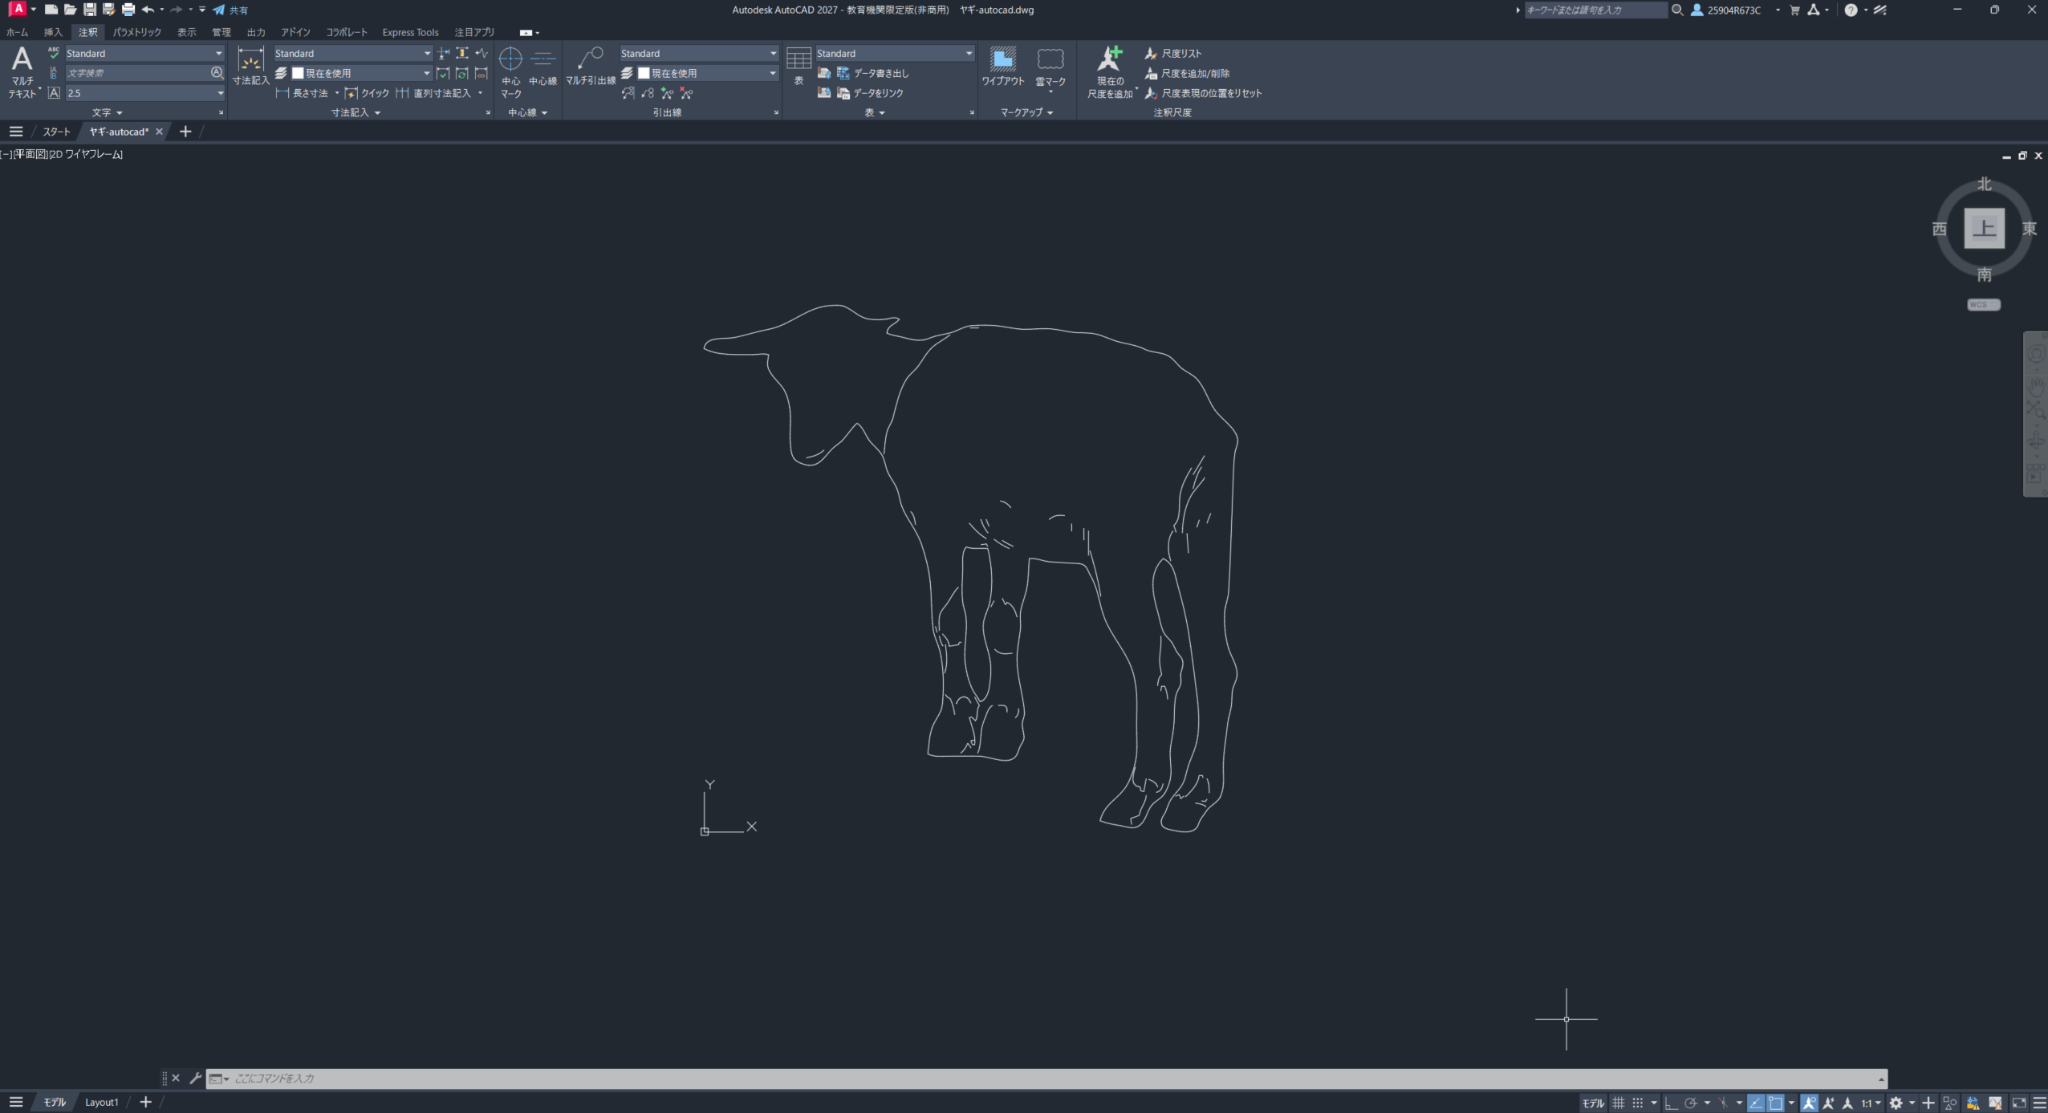
Example in AutoCAD
This example shows an exported DWG opened in AutoCAD. The goat outline and internal lines generated from the photo appear in the drawing.
SHARED LIBRARY
Share and download line drawings
Exporting DWG, DXF or SVG starts a download to your device and sharing to Google Drive. The shared-library page shows previews and links to the Google Drive folders. Check export messages for save progress.
- Items use the selected Subject type: People, Furniture, Plants, Animals or Other — five categories in total.
- Multiple formats of the same drawing saved from the same browser are grouped as one item.
- Different drawings are saved separately even when their names match.
- The original photo is displayed and processed only in your device’s browser. It is not sent to or stored on the site’s server or shared library, and is not visible to the operator or other users. Only the exported line drawing is shared.
- Open Shared library in the top navigation.
- Choose a category and check the preview and name.
- Choose Open in Google Drive on a material to open its folder and download the file you need. Open the Google Drive storage folder opens the shared folder.
To request removal, include the item’s name and material ID and contact us via Contact. Only the administrator can delete shared items.
A local download starts even if sharing fails. Select Retry sharing to send it again. Posting may fail if browser cookies are disabled.
Shared items follow the site’s access settings. Once the site is public, other users can use them. Export only drawings you are allowed to share.
TROUBLESHOOTING
Troubleshooting
The image is clipped or the view has shifted
Select Fit to view. Settings stay on the left and the workspace on the right when resizing. Scroll settings independently; scroll tabs and zoom controls horizontally on narrow screens. The wheel zooms when over the workspace.
Selection window or Eraser does not work
Generate lines first, choose a Deletion method and select Start trimming. Work in Line drawing or Overlay. Turn off Pan tool and release Space.
If a long line remains, drag right to left for crossing selection or use Eraser to remove just part of it.
AI selects the sky or background instead of the subject
Draw a box around the entire subject, then click inside it. Use + Click subject to add points on leaves and trunks, and − Click background to mark unwanted areas. Place points inside the subject or background, away from the boundary.
Green marks the subject and red marks the background. Check the result before generating lines. Use the + Keep and − Remove brushes to correct remaining issues.
Fine legs or branches disappear / background remains
Correct Subject mask with Keep and Remove, then regenerate. Zoom in and use a small brush for detail. To change resolution, choose it and reload the image.
Editing part colors does not change the lines
After Finish part editing, select Apply edits to lines. Transparency changes only the preview.
Recognition or generation is slow
The initial model download may take time. Try Retry on CPU after an error. Lower the processing resolution and reload the image to reduce generation work.
Dimensions are wrong in Illustrator
Choose Paper size, verify height and scale, and export a new SVG. At 1700mm and 1:100, the paper height is 17mm. Previously exported files are not updated automatically.
Updates are not visible
Save your current drawing first. On a computer, try Ctrl+F5; on a phone, reload the page.